


I came across the recipe for Paneer Kheer/Paneer Payasam in a Tamil Magazine. The original recipe required for pressure cooking paneer, so I modified it. It was a hit with my husband the first time itself, in spite of the fact that he is not a big fan of paneer. The kheer tasted like Basundhi, because of the the grated paneer. So I modified my recipe again, by increasing the quantity of paneer so that it would have the exact texture of Basundi. This is my mother-in-law's favorite too, so she asked me to make this for Ugadi. This time I made another modification, I used Evaporated Milk instead of regular milk. Wow! It was the best ever.
Ingredients:
1. Evaporated Milk - 2 cans (I used 1 can of whole milk and another can of 2% milk. You can use regular milk also, around 5 cups, whole milk preferably)
2. Paneer - I used 3/4th of a 400 gm pack. (If you want basundhi like texture you need 3/4ths or else change it according to your taste)
3. Sweetened Milk - 1/2 can (or as per your taste)
4. Sugar - couple teaspoons to mix it with the grated paneer.
5. MTR Badam (Almond) Mix - This is optional. (updated: a couple of teaspoons is enough) The original recipe only called for sugar to be mixed with the paneer, I thought mixing the badam mix would give a rich flavor. If you don't have that in hand you can always use saffron strands and the other regular garnishing and flavoring like cardamom powder, pistachios etc.

Procedure:
1. Grate 200 gm of paneer (half of the pack), add sugar and the Badam powder and mix everything thoroughly.
2. In a heavy bottomed vessel (this one is very important) add both the cans of milk and let it boil. The color of evaporated milk was so good, I strongly feel that Pal (Milk) Payasam would taste excellent if made with evaporated milk instead of regular milk.
3. Once it starts boiling add half the can of sweetened condensed milk and let it boil.
4. After a couple of minutes add the grated paneer and let it cook together with the milk. After sometime the paneer would have dissolved, not entirely though. You can either stop at this stage for paneer kheer or continue to take it to the next level.
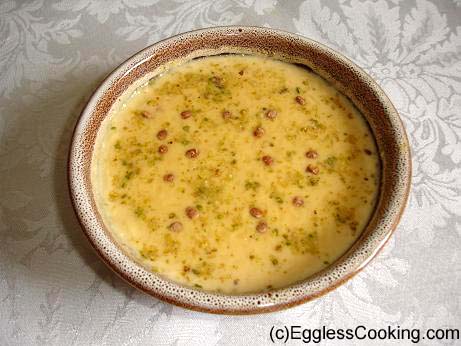
5. If you decide to go with basundhi, grate the remaining paneer (depending upon how much you want or the texture you want. I used another 1/4th) directly into the vessel and let it simmer for just 3-5 minutes. Switch off the heat and it will thicken by itself and it will have the exact texture of basundhi and will taste exactly like basundhi. I had the pistachios and almond mixture I prepared for baklava, so I mixed that one too. Needless to say it was very very very delicious!
Update:
If you decide to make basundi, you can add 3/4ths of the paneer straight away while the condensed milk mixture is boiling. I asked my friend to try this method and she told me that it came out very well. Keep it on the stove for another 3-5 minutes and turn it off. The kheer will start to thicken and you will get the basundi texture.


")
