
Although I have not tasted Baklava, I have always been fascinated by it. I saw an episode of Sandra Lee's semi home made cooking recently, where she prepared Baklava Roll Ups. I felt that it was easier then the traditional baklava making. I also saw A-kay's version of baklava. It was the real deal. In general preparing baklava requires some patience. Actually I'm OK with the patience part; I love to do this kind of stuff. Getting some quiet time is difficult for me. With a toddler around, I'm always running behind him or the vice versa. He doesn't let me do anything. The only time I'm free is when he takes his afternoon nap. So I thought of simplifying even Sandra Lee's version. Anyhow I bought both the regular phyllo pastry and the phyllo pastry pre baked shells from the grocery store. I thought I will make either her version or mine depending on the time I get.
I placed both the packets in the fridge to thaw overnight. I pre-heated the oven at 350F, started preparing the pistachio and almond mixture. When I thought of removing the phyllo pastry sheets from the packet, I heard my son running from his bedroom, he got up very early today. So back it goes into the freezer. I settled him giving some snacks and decided to do my version. I removed the pre baked pastry shells from the carton, lined it on a baking sheet, drizzled some honey, added a teaspoon of the nuts mixture and drizzled some more honey on top and baked it for 8 minutes. It was nice and red on the corners when it came out of the oven. After a couple of minutes, I was able to taste it and it was very good. Since I have not tasted a traditional baklava, I don't have anything to compare it with. For me it was a "tasty, quick fix, make ahead in case of a party and store it in the fridge" dessert. Everybody in my family liked the taste. That by itself is a big deal for me with picky eaters around.
Stage 1:
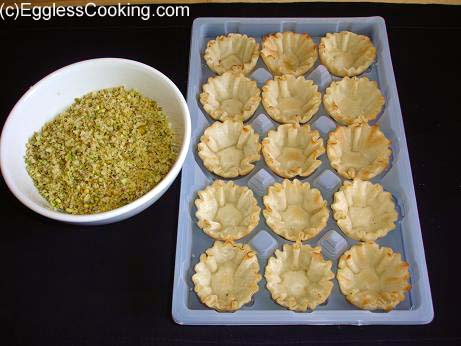
Pre heat the oven at 350F. Prepare the nuts mixture. I just took equal amounts of pistachios and slivered almonds, a tablespoon of butter at room temperature, sugar (as per your taste) and pulsed it in a food processor. I did chop the pistachios roughly before adding it to the food processor. Remove the pre baked pastry shells from the packet. I had thawed it overnight, but later only I saw that thawing it for 10 minutes is enough. So do go through the instructions in the package before hand.
Stage 2:
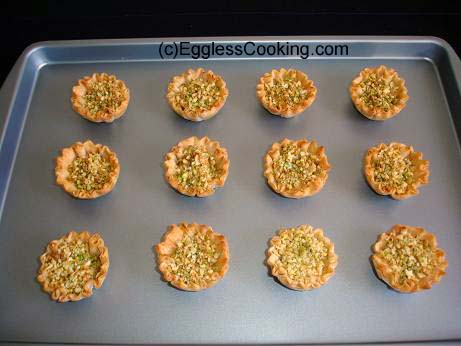
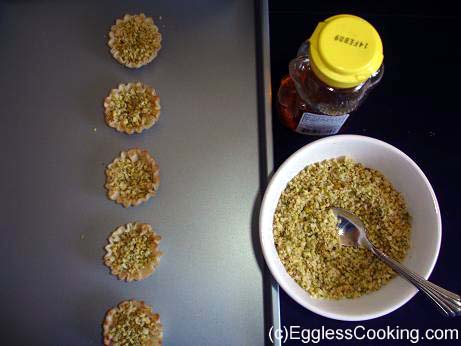
Line the pastry shells in a baking sheet. Don't throw away the carton the shells come with, you can use it to store them after baking. As always I tried only 5 of them at first. But you can go ahead and do all at once because it came out well. There is nothing to mess up. Drizzle some honey in the shells and then top it with the mixture and again drizzle honey on top of the mixture. Bake it for 8 minutes or as mentioned in the instructions.
Stage 3:
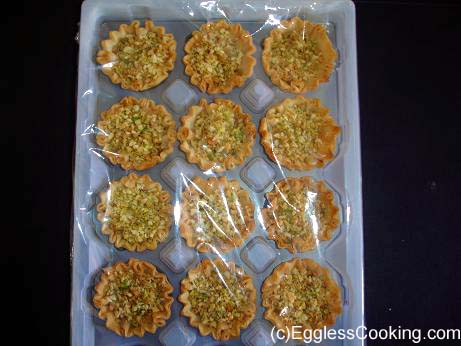
Once baked take it out of the oven, either enjoy immediately or place the baked shells back in the carton and cover it with a saran wrap and store it in the fridge for later.
Variations:
1. Top it with whipped cream or vanilla ice cream for a gourmet kind of dessert.
2. If you let your imagination wild, you can come up with different kinds of stuffing. For an appetizer, just bake the shells for 3-5 minutes and then fill with potato masala. It will be a different kind of potato puffs, easy one too. Fill it with anything from salads to chocolate mousse.
Update:
The baklava tasted really good even out of the refrigerator. But one thing I would do the next time is mixing the honey with the nuts mixture itself, to bind it so that it doesn't spill while eating. Actually for adults it's just one mouthful or two bites, it was not a problem, adding some honey on top of the mixture did bind it up, but my son was spilling it while eating.

n�khet kuzuo?lu says
please find a recipe. how to make homemade baklava at home in turkey. i think you can find it easly. it is delicious. you can find many pictures in the google images. they have magnificent images. please try baklava at home. it is a must have dessert.
Madhuram says
Anjali you are most welcome.
Thanks Sarada. Do try it out, it's easy and delicious.
Sararda says
Looks nice. Good click...Thanks for sharing. I have been thinking about making them though it did not happen. I will try your recipe.
Anjali J. says
Ahh they look so good.. i would love to try it out.
Madhuram says
My friend SS has sent the picture of baklava she made last weekend, telling that it was inspired by me. Check it out here. But now I'm inspired by her to try the original version.
Thanks SS. I really appreciate it. 🙂
Anjali says
Hi madhuram, this is just place I will be visiting for eggless cooking.
arundati says
i always thought baklava was a copiously long process...this is such a better option!! looks wonderful!!
Madhuram says
Thanks Roma for such a lovely compliment.
Roma says
Madhuram, it looks simply delicious.
Its amazing how you can churn out such exquisite recipes, one after another!